Ataques
Vulnserver KSTET multistage exploitation

VP of Hacking
Actualizado
17 jun 2020
16 min
This is the fifth article on the series of exploiting Vulnserver, a VbD (Vulnerable-by-Design) application in which you can practice Windows exploit development.
In previous posts, we have been able to exploit Vulnserver commands:
TRUNwas exploited using a direct EIP overwrite, with virtually no space or character restrictions to work on.GMONused a Structured Exception Handling (SEH) overwrite to take control of the execution flow.GTERshowed up with space restrictions, and we were able to exploit it using egghunters and WinSocket stack reuse.
In this post, we will exploit the KSTET command where, as we will see later, we will face a more restrictive space buffer to work with, but we will use a different way to exploit it.
Let’s start from scratch.
Fingerprinting KSTET
Enumerating and fingerprinting is the most important step when verifying the security of any target.
Let’s check how the KSTET command behaves:
Well, easy enough. Now we are going to do the same, but we will check it under our debugger. I will use Immunity Debugger.
The first step is to identify where the KSTET command is processed.
We can do that by right-clicking, then Search for → All referenced text strings, right-click again, then Search for text and type KSTET. Make sure that Entire scope is selected. Now, select the match on where KSTET string is presented and set a breakpoint:
With that in place, we can start our connection to Vulnserver again and see what happens under the hood:

As you can see, several things are happening:
Our breakpoint was reached when we typed
KSTET hello.Several external functions are called, including
strncpy,mallocandmemset.There is one function that stands out:
strcpy, which will copy anything that is on one buffer to another, without checking buffer boundaries.
Let’s see what happens when we issue something larger than a hello to the KSTET command:

Uggh! With a very short string, Vulnserver crashed, and we overwrote EIP, which means that we can control the execution flow of the application.
With that, we can start creating our proof-of-concept exploit:
And check it:
That’s good news. However, the injected string was really short, and maybe we’d have a narrow buffer space to work on.
Checking available buffer space
If we check the state of the application after the crash, we will see this:

In the dump window (bottom left), we see our injected buffer. In the PoC, we sent 200 A chars, but as you can see here, the total amount of injected bytes, including the word KSTET itself, is only 0x63 or 99 bytes.
In the GTER command exploitation, we had 140+ bytes to work on, and we used two techniques: WinSocket stack reusing and an egghunter.
The first one is not viable because, although we reduced the shellcode length to the half, the resultant shellcode was 128 bytes.
We could use an egghunter here, but that wouldn’t be much fun. Why make it easy if we can do it the hard way?
Ok, let’s start by checking the offset of the crash by creating a cyclic pattern of 100 characters using pattern_create.rb tool from Metasploit:
And update our exploit:
And check it:

As you can see, EIP was overwritten with 63413363. We can check the offset of that bytes on our cyclic pattern to get the offset on where EIP gets overwritten:
Now, check that offset by updating our exploit:
And run it:
Wonderful! We know exactly how to overwrite EIP to get control over the execution flow.
Exploiting
As with the TRUN and GTER commands, we have a direct EIP overwrite here, and the ESP register points directly to our controlled buffer. That means that we can look for a JMP ESP instruction and overwrite EIP with its address to take control of the execution flow. We can do that using mona.py plugin:
This would tell mona to look for instructions that can be used to jump to ESP (jmp -r esp), excluding pointers with null bytes (-cp nonull) and omitting OS DLLs (-o). The result is the following:

We can choose any of those 9 pointers. I’ll choose the one at 625011BB.
Now, we can update the exploit with that address:
And check it:

Great! However, as you can see, we landed on a 20 bytes buffer where we put the C chars, but we have 66 bytes above on the buffer of the A chars.
With a short jump backward, we can easily jump to that place:

The resultant bytes were EB B5. We can update our exploit with that:
And check it:

But again, we were brutally reminded that we have a narrow buffer space to work on.
To work around that constraint, we will use a 2-stage exploit this time, where the first stage will be a very short shellcode that opens the door to the second stage, which will contain our reverse shellcode.
Stage 1: Reusing sockets
As we saw on the GTER exploitation post, we were able to reuse part of the WinSocket calling stack to minimize our shellcode’s final length. At that time, the resultant shellcode was 128 bytes. We need to reuse something more in order to fit our stage-1 shellcode in less than 70 bytes of buffer.
Let’s check a simplified structure of a TCP server and client interaction:
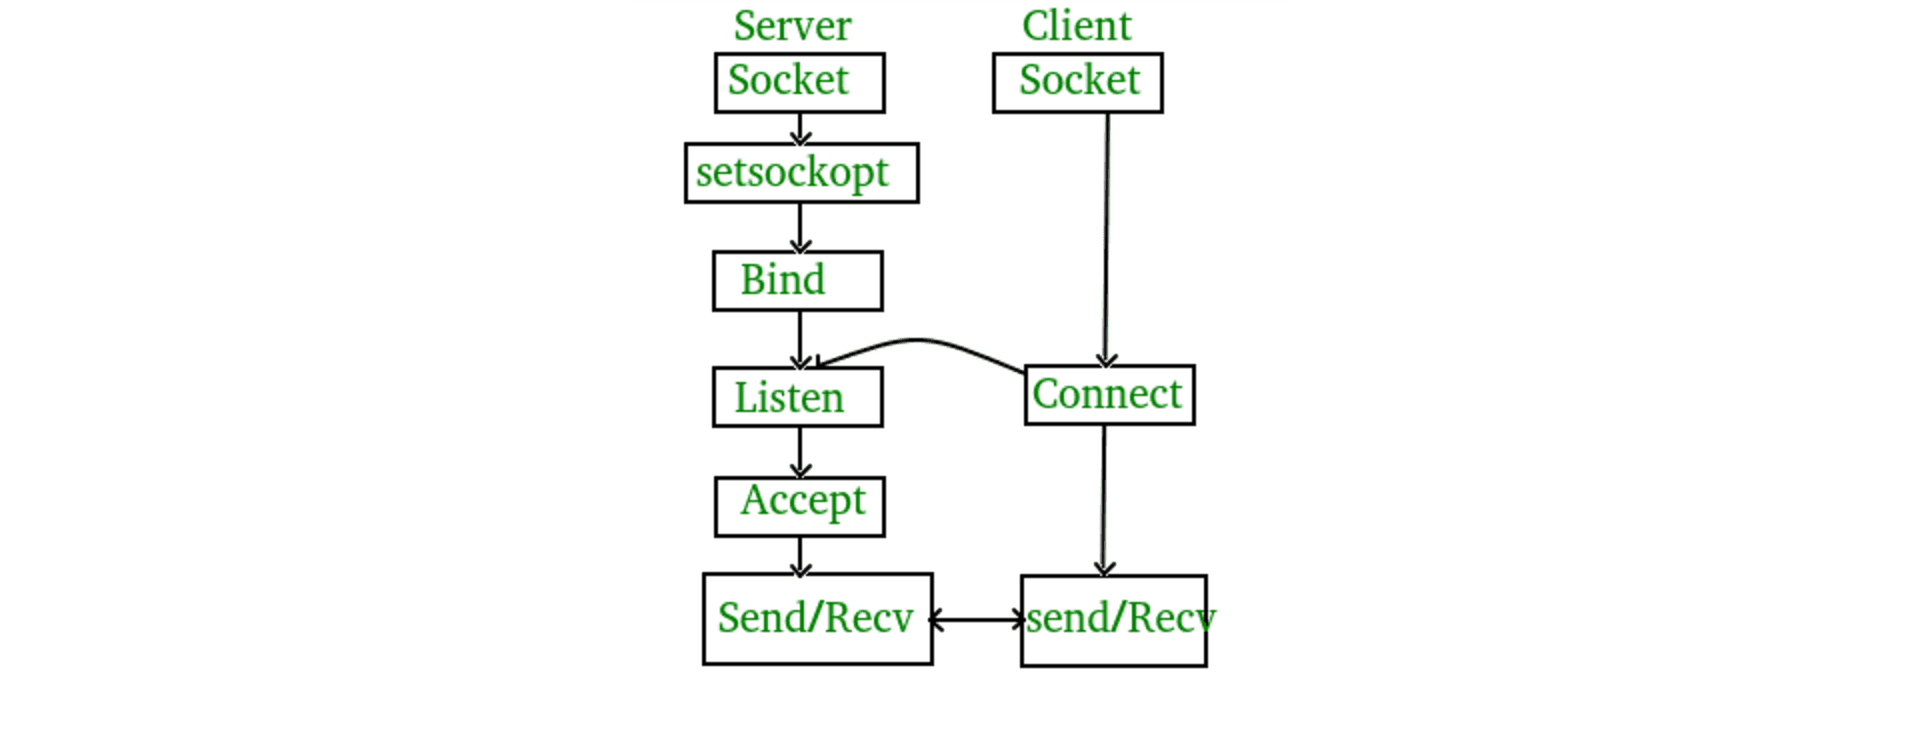
Image taken from https://www.geeksforgeeks.org/socket-programming-cc/
We can see the different functions needed by both the server and the client to perform a TCP communication.
And you can notice that the actual data exchange occurs at the end by sending and receiving information.
What we will do for our stage-1 shellcode is take advantage of that calling stack, and create a shellcode with only a new recv() call instance, reuse the socket handle that uses Vulnserver to bind to port 9999 and set it up to receive and execute our stage-2 payload that will contain the reverse shellcode.
But first, we need to know the structure of the recv() call:
Taken from https://docs.microsoft.com/en-us/windows/win32/api/winsock/nf-winsock-recv.
Easy! The parameters are really simple:
SOCKET sis the socket handle.char *bufis a pointer on where the received data will be stored.int lenis the total amount of data expected.int flagsmodifies the behavior of therecv()call. In our case, it can be zero.
But first, we need to know 2 things:
The address of the
recv()call in the system.The value of the socket handle.
To do that, we can use the debugger again, by right-clicking on the CPU window, selecting Search for → All intermodular calls, looking for the call to WS2_32.recv and setting a breakpoint on it:

Now create a new connection:

Wonderful! We can see the parameters of the recv() call on the stack window (bottom right) from where we can get the value of the socket handle (144). We also got the address of the recv() function at 0040252C.
With all the needed values, it’s time to write some Assembler! Remember that we need to avoid null bytes, and we have to push the parameters in reverse order:
That looks good, but in fact, that code has a problem: the value of the socket handle is created dynamically at runtime. However, the socket handle is nothing but an integer.
Having noted that, we can update our shellcode to brute force the value of the socket, starting from 0 until it finds the right one!:
shellcode.asm.
That looks better. We can compile that using nasm:
And obtain the shellcode using this:
Great! Our final stage-1 shellcode is only 34 bytes long!
Let’s update our exploit to inject it:
And check it:

Wonderful! Our brute forcer was able to discover the socket handle value on EDI=0x144 and it’s ready to receive our stage-2 payload!
Stage 2: Injecting a reverse shellcode
Now all that’s left is to create a reverse shellcode and send it over our stage-1 payload backdoor. As a bonus, as we control the recv() call, we are not limited by bad chars on the shellcode.
Let’s create it:
And update our exploit:
Several things are worth to mention:
We created a
STAGE2variable with the shellcode and padded the rest of the 1024 bytes with NOPs (\x90).We added a
time.sleep(3)to wait for the brute force to get the socket handle.And finally, we send the stage-2 payload.
Let’s see it in action:

Beautiful! As you can see, the shellcode was injected below our execution flow, so it will eventually be reached and triggered. Also, the socket handle was now 0x151, which means that our brute forcer worked just as expected. Let’s see if we got the shell:

Woohooo! We got our shell! And in a lot more fun way than with egghunters, huh?
You can download the final exploit here.
Conclusion
Multistage exploitation is a very cool method to use the available bytes to create exploits. Tools like Metasploit use staging to deliver complex payloads like Meterpreter, but when you do it yourself is a lot more rewarding!

Get started with Fluid Attacks' PTaaS right now
Suscríbete a nuestro boletín
Mantente al día sobre nuestros próximos eventos y los últimos blog posts, advisories y otros recursos interesantes.
Otros posts