Ataques
LTER: Overcoming bad chars that are everywhere

VP of Hacking
Actualizado
1 jun 2020
37 min
This is the sixth article on the series of exploiting Vulnserver, a VbD (Vulnerable-by-Design) application in which you can practice Windows exploit development.
In previous posts, we have been able to exploit Vulnserver commands:
TRUNwas exploited using a direct EIP overwrite, with virtually no space or character restrictions to work on.GMONused a Structured Exception Handling (SEH) overwrite to take control of the execution flow.GTERshowed up with space restrictions and we were able to exploit it using egghunters and WinSocket stack reuse.KSTEThad a very narrow buffer for us to work on, but we were able to use a multistage exploit to get our shell.
So far, we’ve been faced with mostly buffer space issues, but with little to none restrictions on what kind of instructions we were allowed to use.
But in fact, instruction restrictions are the rule. Think about exploiting a Host HTTP header: A host name normally is only alphanumeric and few other chars are allowed. If we are going to inject code on that header, we would surely be limited to use instructions whose opcodes are in the allowed list.
In this post, we will exploit the Vulnserver LTER command.
We’ll have to use techniques we’ve learned on our previous posts and include others to exploit that command successfully.
Fingerprinting LTER
The enumeration part is the most important step. This will lead us to the right path of exploiting our target.
We can create a new connection and see how LTER command works:
Now try with something bulkier:

Hmm, something’s not right. We can create an initial exploit to test faster.
Now use a debugger to see what’s going on:

Well, it seems we’re facing an SEH overwrite. Please, check this post for an explanation of SEH.
OK, we need to figure out the offset by:
Creating a cyclic pattern.
Checking the offset of the pattern found in the SEH handler.
Let’s do that:
Update our exploit:
And run it:

The SEH handler was overwritten with 356F4534. We can check the offset using pattern_offset.rb:
That means that the SEH handler was overwritten starting at byte 3554. Let’s update our exploit to reflect that offset:
And check it:
Great. If we trigger the exception handler, we will overwrite EIP.

The stack window (bottom right) shows that our buffer is 8 bytes below the stack pointer ESP, so we need to find a POP/POP/RET sequence on the executable modules of Vulnserver that makes us land directly over the nSEH field which we now control. mona can help us:

We instructed mona to find POP/POP/RET gadgets (seh) and exclude pointers with null bytes (-cp nonull), those with SafeSEH enabled (-cp safeseh=off) and not belonging to the OS (-o). That gave us 12 pointers.
Let’s use the first in the list (625010B4) to replace our B buffer:
With that, we’d be able to run that sequence that will direct the execution flow to our controlled buffer. Let’s check it:

Hmmm, something’s not quite right. We injected 625010B4, but for some reason the application turned the last byte of the address (B4) to 35 and got 62501035 instead. We didn’t expect that.
We need to check what other variations would be applied to our buffer in order to get the available bytes we can work with.
Hunting for bad chars
Let’s look at this image:

We can see here that our application works with ANSI encoded strings. ANSI chars are 1 byte long, which means that all the available ANSI chars are in the range from 0x00 to 0xff.
With that in mind, we need to know which of those 256 possible ANSI chars will be mangled by the application when we are injecting code.
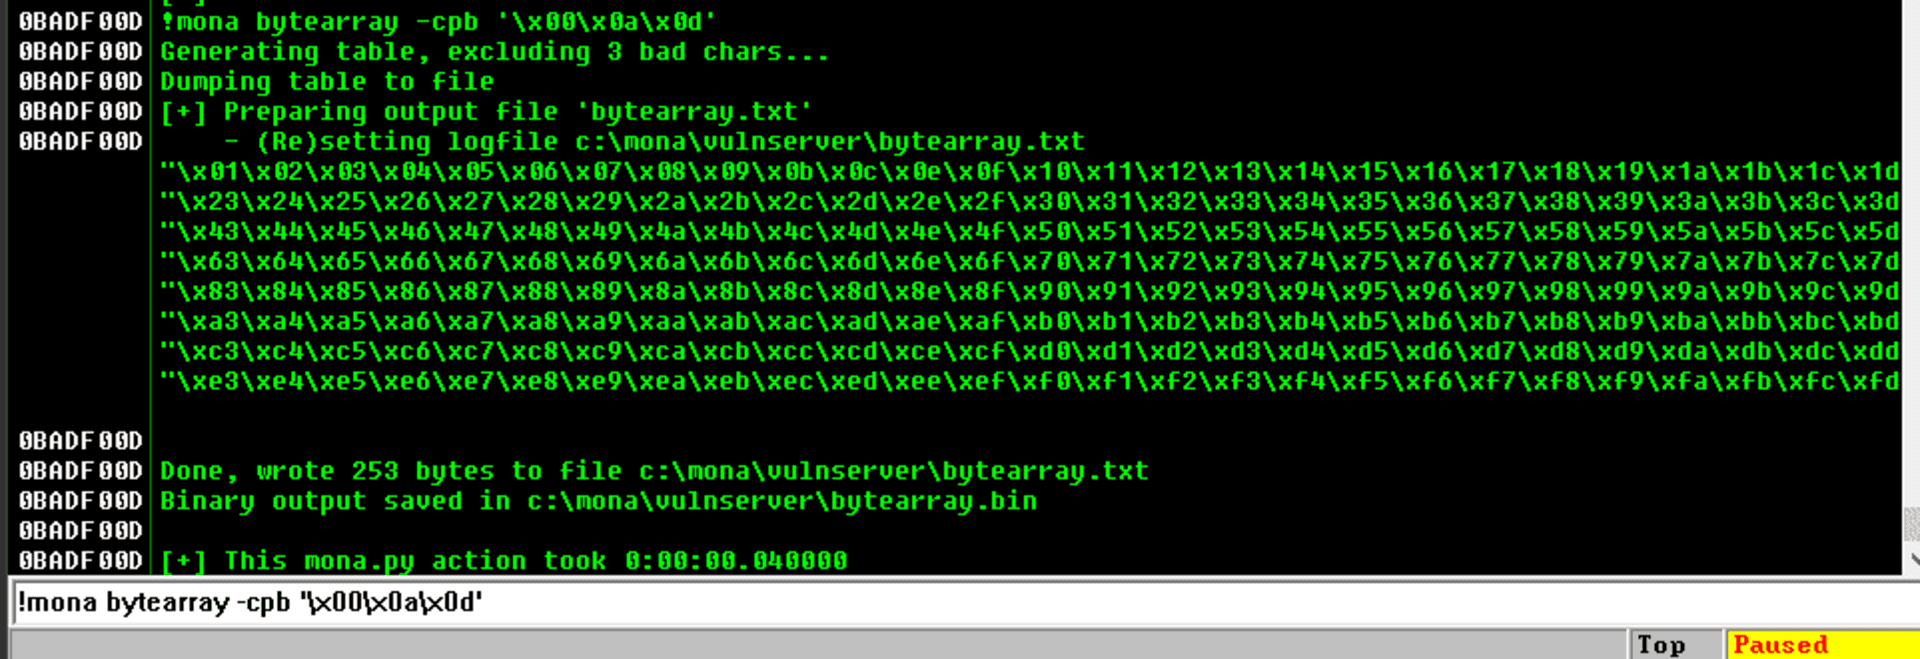
To do that, mona can help us again:
This will create an array with all the 256 available ANSI chars:

I’ve mentioned in other posts that it’s a good idea to exclude null chars (0x00), carriage return (0x0d) and line feed (0x0a) from our shellcode. We can filter them in advance with:
Or with Python3:
Now we can inject that array into our exploit:
Now, run this updated exploit to check how the LTER command treats all the chars:

We can see several things here:
Our payload of bad chars was successfully injected after the
LTER.string.It seems that all the chars, from
0x01to0x7fwere successfully injected.When the bytearray reached the char
0x80, it was converted to0x01, then0x81to0x02, and so on.
There is a more graphical way to check that, using mona once again:
This will tell mona to compare the contents of the previously created file C:\mona\vulnserver\bytearray.bin with the contents of the memory on where our bad chars array started. In the previous example, the bad chars were started to be injected on 00F0F1EE:

So the mona command would be:
And the output would be:
Here is the resulting comparison table:
That’s a lot of very valuable information for us. Now it’s clear why our previously injected address 625010B4 was translated to 62501035.
Allowed charset
In the previous section, we were able to narrow the character set that was allowed for us to inject code. The characters range from hex 0x1 to 0x7f, excluding 0xa and 0xd. That range belongs to what’s known as the ASCII character set. In Linux, you can see the ASCII table using the command man 7 ascii. However, a simple search on Google will give thousands of results.
This means that for now on, we are limited to work with that set of characters.
The first thing we need to do is to search another POP/POP/RET gadget on a pointer that contains only bytes allowed on our character set. To do that, we can issue another command filtering the POP/POP/RET gadgets containing only ASCII bytes and excluding 0xa and 0xd:
Fortunately for us, 3 pointers fulfill all our requirements:

Let’s choose the first result at 6250172B and update our exploit:
And check if this time we are able to reach the POP/POP/RET sequence:

Yes! Things start to get better… or not?
Finding useful instructions
After the POP/POP/RET on 6250172B sequence is executed, we landed at the nSEH parameter, and we need to get past over the injected SEH handler address. What we did before with the GMON command was to perform a short jump. That jump had the bytecode \xeb\x08. However, this time we are limited by instructions on the \x00 - \x7f range, so the short jump opcode (\xeb) is not an option. We need to find an instruction that can perform a short jump and has an opcode in our allowed character set. That instruction must also fit in 4 bytes or less.
Luckily for us, conditional jumps are the answer:
They are 2 bytes long.
Most of them have opcodes on our allowed range.
However, we need to choose the appropriate condition that actually performs the jump. For example, if we choose the JNZ conditional, we must make sure that the condition is always true in order to perform the desired jump.
Or, we can use some discrete mathematics here and take advantage of predicated logic and use two opposite 2-bytes conditional jumps. The logic is simple:
Having
Bool(ZF) = unknownAs we don’t know the current value of
ZF, predicated logic says thatBool(ZF) || ~Bool(ZF) == true
So, instead of injecting a simple JNZ SHORT +0x8, we will inject two conditional jumps:
This will ensure that no matter the value of ZF on the processor, any of those instructions will be true, and the jump will be performed. Let’s update our exploit with that:
Now check if that worked:

It did! The first condition was not met, the second was, and the jump succeeded.
Now, after successfully jumping over the SEH handler, we landed on a 41-byte section where we injected our C buffer. What would normally happen is to perform a long jump back to the start of our A buffer to make some more room to inject something larger like a shellcode.
While that is certainly true, we can’t perform a normal long jump because it will contain unallowed bytes (\xff, for example).
Checking existing encoders
To overcome that, we will need to start encoding everything we inject, using our allowed characters, in a way that it will decode in memory and execute the needed action.
Let’s encode our first needed instruction: The long backward jump.
First, we need to get the desired opcode:

As we can see, we’d need to inject an encoded version of E9 13 F2 FF FF.
First, we’re going to try existing encoders. We will try those available on msfvenom that generate an alphanumeric shellcode:

Having a restricted 41-byte buffer, the common alphanumeric encoders are not viable:
x86/alpha_mixedproduced a 71-byte shellcode.x86/add_subfailed.x86/opt_subproduced a 61-byte shellcode.
Maybe the long jump instruction is too large. Let’s try with the farthest possible short backward jump JMP SHORT +0x80 = \xeb\x80:
Better. However, it won’t fit either. That means that we have to encode that short jump manually.
Manual encoding
Having our restricted allowed characters set, the technique we will use is known as ADD/SUB/AND encoding. The technique is fully described here.
Basically, what we’ll need to do is the following:
Point
ESPto a place that will be in the execution flow path.Manipulate
EAXusingADD,SUBorANDinstructions to make it hold our desired\xeb\x80value.
Align ESP
To accomplish the first point, we need to do the following:
Get the current value of
ESP.Get the offset between the current
ESPlocation and the place where we want it to be. Remember that it must be later on our execution path.ADDthat offset toESP, so it effectively points to the new location.
Let’s do that:
Note that all the resulting bytes are in our allowed charset. Now update our exploit with those instructions:
And check it. If it works, ESP must point to the very end of our C buffer:

Great! It means that any PUSH instruction will put things in that place. And that’s exactly what we wanted to do.
Carve short jump
With that in place, we need to make EAX holds our short backward jump bytes, \xeb\x80. But we need to do it the right way:
Remember that
EAXis a 32-bit register, so we must pad it with two NOPs. The resultant expected value should be\xeb\x80\x90\x90.As we are pushing that on the stack and keeping in mind that the x86 architecture is little-endian, we must reverse that value and make EAX equal to
\x90\x90\x80\xeband then, when thePUSH EAXoccurs, the injected value would be\xeb\x80\x90\x90.
First, we need to zero out EAX. This can be done using a couple of AND instructions:
This will work because:
Then, we need to find some values that, when added, result in 909080eb. If we divide 909080eb by two, we will get 48484075.8. So we can add 48484075 to EAX and then add 48484076 to make it 909080eb.
Let’s see if that works:
Great!
We can now execute PUSH EAX and our desired \xeb\x80 should emerge like magic:

Isn’t it wonderful? It looks like black magic!
Let’s update our exploit with that:
More jumping around
Great, but we landed on a 78-byte buffer. We need to jump to the start of our A buffer. However, as we saw before, 78 bytes is more than enough for encoding and executing a long backward jump. We will use the same strategy as before.
First, we need to know the exact instruction of the desired long backward jump:

The resulting bytes are E9 2D F2 FF FF. We must perform a long jump not to the very start of our buffer, but somewhere in the first bytes. This is because we don’t know at this point the memory address on where the JMP instruction will be generated, and thus, the offset will likely change.
With the required bytes, we need to align the ESP pointer again. As we saw, it’s a good idea to point it to the higher memory of the block in order to avoid overwriting our encoded payload. This leads to:
Let’s update our exploit:
And check it:

Great! We can now encode our long backward jump. This time I will use a tool called Automatic ASCII Shellcode Subtraction Encoder. Elias Augusto created it and I added some convenient improvements.
Let’s get our encoded jump:
Great, let’s add that LONG_JUMP variable to our exploit:
And check it:

Fantastic! Now we have enough room for encoding something really useful.
We will use the stager shellcode applied to exploit the KSTET command, with only a slight modification on the ESP alignment (2 bytes instead of 64; more information of that stager on the KSTET writeup):
shellcode.asm.
We can compile that using NASM:
And get the expected shellcode with:
Now, let’s encode that with our tool:
We need to align our ESP pointer again:
And update our exploit with that. Remember to add a padding in the first bytes, so our long jump lands there and the execution slides to our stager:
And check it:

Weeeh! Now to finish, we can create our shellcode and insert it on our side channel created by the stager. As we now control the recv() call, we are not limited by the bad chars! Let’s do that:
Update our exploit:
And check if we got a shell:

Wonderful! It was easy, isn’t it? No, it was not, but we learned a lot!
You can download the final exploit here.
Conclusion
Dealing with bad chars when exploiting is very common. Generally, encoders from known tools like msfvemon will help us to overcome those restrictions, but there are some picky applications that will make us drive the extra mile, but it’s worth it.

Get started with Fluid Attacks' PTaaS right now
Suscríbete a nuestro boletín
Mantente al día sobre nuestros próximos eventos y los últimos blog posts, advisories y otros recursos interesantes.
Otros posts